Friday, September 3, 2010

Reality Suspended

The time has come to face reality and make some choices.

I am retiring in less than four month. My plan is to leave California in early January to drive cross-country visiting friends and family along the way to Virginia. In Virginia I will pick-up a 13' Boler camper trailer and truly begin the adventure.

In the meantime I wanted to “finish” my Goat Island Skiff, take it to Paulina Lake in Oregon and enjoy sailing this beautiful boat I built.

I have been experiencing increasing levels of anxiety as each day fell away from the calendar. I need to pare my possessions down to a bare minimum. The goal is to leave California with what I want in the Jeep and to not have anything in a storage locker in California.

I cannot do both – prepare the boat for Paulina Lake and get rid of those possessions I do not want. I have chosen to focus on the big picture: preparing to leave California.

The boat work can wait. I have been offered space in central Michigan to store the boat and to stay as long as I like. I will take the boat to Michigan in January or later in the spring depending on the weather. Space and time will let me finish the Goat Island Skiff in proper fashion next spring.

So, the bottom line is, I will not be building the mast or the sail this month. I am, in effect, suspending work on the GIS to give me the time to prepare for moving out of the apartment and storage locker on January 1, 2011.

As work resumes and progresses, I will post updates.

Tuesday, June 8, 2010

Bow Repair Nearly Done

Well, slowly but surely, the bow repair is nearing completion. No, I haven't spent much time on the boat lately and you'll just have to take my word for it that I have been spending my time in worthwhile endeavors.

The the hook nose - er, bulb bow - was ground away along with the offending dowel ( I still believe that the dowel offered a solution to my perceived problem but was poorly installed - leading to the massive quantities of filler} as well as the paint, primer and epoxy. Down to the bare plywood. I sanded the bow down to bare ply back about 15" from the stem. Once all of that was removed, I began reinforcing the bow.

I applied a coat of neat epoxy to the bow and then wrapped a piece of 6 oz FG cloth around the stem and back about 9" on each side of the hull. Additional epoxy was applied wet-on-wet to fill the weave of the FG. Slightly thickened epoxy was used to finish filling the weave and to fair the edge of the cloth with the hull. When the epoxy had set up there was more sanding to do. I was pleased with the results as the work progressed through the end of April.

May was a busy month for non-boat type activities. A two-week vacation in early May was well worth the time away from the boat. Since returning to work I have been getting things figured out and lined up for an unexpected treat - I recently realized I will be able to retire at the end of the year! The possibilities for retirement are almost endless! And so far, no one has told me, "No, don't retire - it isn't worth it!"

So, getting back to boat work (I began varnishing the oars last week), I have just about finished the bow repair. Here is an "After" photo of the straight edge taped to the hull. The hollow is gone! If you recall the "Before" photo (or go look at the previous post), you know the hollow was very pronounced. I am happy with this aspect of the repair.


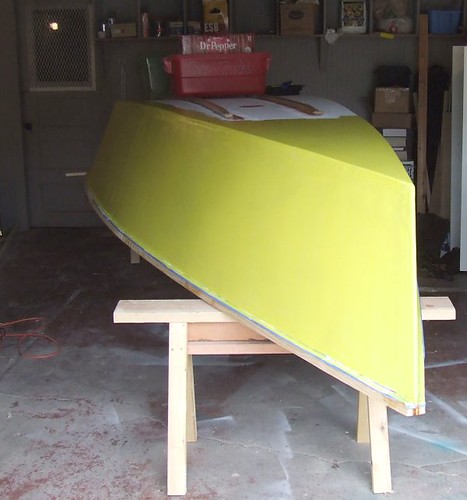
Here is the starboard side of the bow with two coats of primer and a single color coat.


Even though I will apply additional color coats, I am less than pleased with the results so far - the area where the new paint on the repair blends with the original hull paint needs some work. I suspect additional coats of paint will help blend the two together. In addition, although not very visible in this photo, there is a faint line where the edge of the FG cloth is faired (or not!) with the hull. I am disappointed with this line as I could not see it or feel it before the color coat was applied. Perhaps I will refinish the hull this coming winter.

The bow definitely looks better now than when the boat was launched in February and when I had it out for a row in March. This weekend I am taking it back to Richmond to experiment with several small boat sail rigs. A friend has access to an assortment of sail rigs that have been in storage at his sailing club. Since my mast and sail are not ready, this will give me an opportunity for some sailing! I'll report on that outing early next week.

Tuesday, April 27, 2010

Bow Repairs - Revisited

Having identified the problem, I set about to correct the errors I built into the bow.

These images are self-explanatory. If there are any questions, just ask.

Port Bow (after a bit of sanding):


Port side, voids, hidden behind the FG tape and fairing compound, appeared during the gross sanding - done with 80-grit disks on a ROS.


Lumpy starboard side - and still, with all that thickened epoxy, that visible hollow and "hook-nose" were evident.


Having created a lot of dust grinding away with the ROS, I uncovered the starboard voids. Taking apart my own work was helpful in several ways: It showed me that rushing through a task rarely makes sense. I also learned that I fooled myself into believing - at the time - that I had done a decent job of fairing the bow (I downplayed that hook-nose look in my mind's eye.). It was at this point in the deconstruction I decided to take out the dowel and fair the stem and bow properly.


More of the starboard side.


All of the fairing compound and the entire dowel were sanded away. Doing that also took me down to bare plywood. I was able to do some sculpting with the ROS to get the stem shaped nicely.

(I'll add a couple of photos showing that step - but the camera doesn't do it justice).

Next - Fairing with epoxy, FG, and filler.

Tuesday, April 20, 2010

Bow Repairs

Goodness, after last month's outing in Richmond, I have been busy - a bit reclusive, but busy.

One major effort has been the repair and fairing of the bow. This is what the bow looked like early last month:


Almost a "hook nose" or maybe a modified "bulbous nose," but either way in need of repair.


Damaged riding home from the outing... obviously, I need to figure out the trailer set up and configuration.

Another perspective of the hollow originally (but not intentionally) built into the bow:


That's a short metal ruler taped to the hull to show the depth of the hollow.

A bit of work was going to be needed to fair the bow. Fortunately, I avoided creating a similar hollow on the port side. However, the port side had its own flaws to be revealed and repaired. Here is the port side after the first bit of sanding:


Let me back up just a bit... How did such a catastrophe ever result from the simple slab-sided Goat Island Skiff design? I can assure you it wasn't easy!

When I assembled the hull, I did not get the two side panels as close together as they should have been right at the stem. Now, that was my take on the plans and how I assembled the hull. Having gone through this entire repair process, I'm not so sure...

But, I was convinced that the gap between the side panels needed to be closed. The gap seemed huge, flat (once partially filled with thickened epoxy) and altogether wrong.


(And, yes, the outwales to not match up - but a later solution will take care of that.)

My solution to filling the gap and getting a start on fairing the bow was to glue a dowel into the gap, cover the dowel with FG tape, and fair it all into the hull. In theory that should have worked and probably would have, had I used a smaller dowel and taken a bit more time to install it. As it was, I was pushing against a self-imposed deadline and I used too large (3/8") a dowel. I troweled fairing compound on the bow trying to get a fair shape. Failing that, I covered the stem with FG tape, thinking the tape would span the hollow and provide a nice sleek shape. Didn't work.

Next, the deconstruction...

Sunday, March 14, 2010

First Adventure!

Although there is still work to do on the boat, it was time for my first adventure with my boat (I like the sound of that - my boat)

Yesterday was one of those Chamber of Commerce days and I had the good fortune to spend it on the water in small boats!

I left Sacramento under blue clear skies and 35*. An hour and a half later, I was in Richmond, CA, under the same blue clear skies and about 55* and warming.

Getting ready:


Underway:


We launched at Marina Bay located in the Inner Harbor in Richmond, CA. I rowed while Thorne (WBF followers will recognize the name) sailed. 90 minutes after launching, I arrived at the Point San Pablo Yacht Club. Thorne arrived about 30 minutes behind me. We had a great potluck lunch (my contribution of oysters with crackers and homemade truffles was well received!).

The Goat Island Skiff rows well - and will do even better once I practice a bit more! I'm also getting help with some ideas on installing foot braces to help with the rowing. I borrowed 8' oars yesterday but my own (there is that word again - my) oars are 9' and the longer length should help, too. I need to finish shaping the oars and then prepare myself for varnishing them... I'm getting help with that, too.

After lunch, I crewed on a Whitehall.


We had a blast! Of course, we had an adventure. An H-28 shadowed us for the afternoon (that skipper's small boat is not quite ready... ).


While our plan - after a fun day of sailing - was to row in (the owner of the Whitehall wanted to see how it behaved under two rowers), The H-28 offered a tow back to the club. Since the Whitehall owner had never been towed before, he opted for the tow.

So, 2 or 3 minutes into the tow, my Tilly hat blows off and overboard. Okay, so we cast off the tow line and retrieve the hat. The H-28 comes around to pass us the tow line - and runs aground (on a falling tide!). He worked himself off, passed us the tow line and proceeded to the docks. Could have been an expensive "lost" hat.

It felt really good to be on salt water again (not sure what the difference is - not that I object to fresh water. I just feel better on salt water.)

Looking forward to the next adventure!

Saturday, March 6, 2010

Getting Ready

I guess I've been too busy working on the boat to post anything lately.

Well, I have been busy. The interior is nearing completion - center case glued into place, second and third coats of epoxy applied to the interior, BH-2 and BH-4 frame arms installed, quarter knees and breasthook installed, inwale spacer "oopsie" repaired, oarlock socket pads installed, and the first color coat applied!

Quarter knee:


Spacer repair (before)"


Spacer repair (after):


That dark square is the BH-3 arm extended up through the inwale.

Sky-box view showing the breasthook and oarlock pads:


First color coat:


I found out today that the color coat reveals more flaws and blemishes than the primer coat revealed. I will apply two more color coats (sanding between) and call it good for next week's rowing event. I will work at cleaning up the warts, pimples, flaws and blemishes after that.

So far, I am pleased with the boat.

Sunday, February 21, 2010

Building Oars

After having cut the blank about a month ago, I finally got around to the fun part. Working with hand planes, I've begun shaping the loom and blade of my first oar - and making a lot of wood shavings in the process.


The oar is still rough, although it is closer to final form this evening than when the pictures were taken earlier today - and there are more shavings on the floor.

This first effort is maybe a "throwaway" piece. Oh, it will probably be usable, but I made a couple of errors in cutting and gluing the blank so I don't know that I could duplicate this oar for a matched set. I have learned a great deal working on this first oar, so I am confident I will be able to produce a decent set of oars for my GIS.

Saturday, February 20, 2010

Then Again...

I went to work on the boat today intending to turn it over to get started on finishing the interior.

Except that I forgot to bring several tools with me... and, the epoxy has set up, so I can fair the bow and get it primed before turning the boat.

Back home and back to the boat...

I sanded the hull and applied another primer coat. The hull is coming along.


Tomorrow I will sand (220-grit) and apply one more coat of primer before turning the hull over.

I am also working on the oars. It is interesting to watch the oar emerge from the glued up lamination. I only hope I can duplicate the effort and match the second oar to the first!

Friday, February 19, 2010

Change: The Only Constant

Change. I guess by definition, Change is not constant. Constants in mathematics and science do not change. But lately, it seems that the only "constant" about this project is change!

This morning I had a plan to have the boat ready for a trip to Oregon in April. Lots of time to finish the interior and get her painted. Then I learned of a local rowing and EBS (Elbow Bending Session, aka a get-together with other boat-builders involving adult beverages) being set up for mid-March. Well, last March I attended a similar gathering and received a good push toward starting this crazy process. I had told the guys I wanted to build a GIS, had the plans but recited a laundry list of "reasons" why I wasn't building my boat. One of them said, "Bob, do you want to build a boat or do you want to whine about not building a boat?" That prompted some discussion and I went home with a different perspective. A week later I was building my boat. So, it is important to me to attend this year's March row and EBS with my Karen Ann.

So, my plan early this morning was to get a couple of coats of primer on the exterior, turn the boat over, and get started on fitting out the interior. After finishing the interior, I would turn the boat over again to install the skids and paint the hull with the color coats. That has changed. In the interests of time, I am now thinking I'll install the skids, finish with the primer, and apply the color coats to the hull before turning the boat over.

And then... I went to the boat to get that next coat of primer applied... Big disappointment and set back.

I had faired the edge of the FG tape on the chine with thickened epoxy. It looked pretty good yesterday but I decided to apply a coat of epoxy to seal the fairing before painting. Today when I returned to the boat, I found the epoxy had run and sagged a bit. No worries, I'll just sand it out... except the epoxy had not set-up completely (about 18 hours) and it gummed up the sandpaper and crumbled into a bit of a mess. Wasting several sandpaper disks, I cleaned up as best I could and applied a coat of primer. That just emphasized the flaws... The hull is going to need a lot more work.

In the meantime, I am working on getting the skids ready to install.

I definitely want to take Karen Ann to the March row and EBS.

Early Morning Diversion

This morning I completed a little side task I hope to install in the boat later this weekend.

When I made the breasthook a few weeks ago, I cut it just a bit too small. It is too narrow and left a gap between it and the hull. Not good. I decided to widen it a bit by adding strips of wood to the sides.

Being triangle shaped, the breasthook does not lend itself to easy clamping - everything just slid apart as the clamps were tightened. So I set about figuring a way to improve the clamping.

I found the matching cut-offs in the scrap box, and thought, great, these will give me parallel surfaces for the clamps... They did, but everything still slid apart.

Then I decided to put two screws in my workbench as stops for the breasthook. That held the breasthook but didn't do anything for keeping the cut-offs in place.

Two more screws in the bench top and I was in business!


The parchment paper is there to keep me from gluing everything to the bench!


The tails on those strips will be trimmed away...

The cut-offs in place:


Clamping:


When I glued this up I placed parchment paper between the cut-offs and the strips. I didn't want to glue the cut-offs to the breasthook.

These added strips are enough to cover the gaps created by the original breasthook and will allow a bit of trimming for a good fit.

I may need to add better stops to the workbench, although the screws worked for me today.

Now, while that sets up, I'll go work on the boat. Sanding, priming, sanding...

Monday, February 15, 2010

This is the Part I've Dreaded...

As much fun as I've had building my boat, I have now reached the point I have dreaded all along. Sanding, painting, and other finishing work has always been my least favorite part of any woodworking project. My impatience combined with a genuine lack of skill in this area make for less than great results.

The chines were covered with FG tape and as I learned at last week's launching, a single coat of epoxy is not enough to fill the weave in the tape. I really did know that but it was clearly demonstrated by the slow leak last weekend. Two more coats of epoxy - and the weave still is not filled and the edge of the tape stands out sharply. I am disappointed.


Yesterday I applied the first coat of primer to the exterior of the hull. I am using KILZ water-based primer/sealer/undercoat. The first coat was thinned 20% by weight, and looked a bit like whitewash over the epoxy coated hull (yes, the primer is white).


That first coat was just rolled on - I didn't try the roll-and-tip technique. The forward section of the bottom received a second coat (I had a bit left over, and the first coat had dried). I did experiment with the roll-and-tip method and it seemed to work alright.


Certainly, the second coat covered better but still shows every little bump, wrinkle, scratch, epoxy run and sag, and flaw in the surface. There is a lot of sanding to be done...

I am not looking forward to this part of the project.

Friday, February 12, 2010

Buying a Trailer

Obviously, I was going to need a trailer. Borrowing a trailer last week certainly made getting Karen Ann to Lake Natoma much easier than car-topping (my original plan). But, I can't borrow a trailer all the time.

I've been watching Craigslist for several months without much success. I pestered the Coots group up in Oregon with a pretty steady stream of questions about trailers: is it worth it to build a trailer (generally, no), how about a utility trailer ( maybe as a last resort), small (cheap)Harbor Freight trailer (a few fans but consensus was, no), and other questions.

Tuesday evening I found a "galvanized trailer for 12' to 14' boat" for sale on Craigslist. I called Wednesday morning and left a message. When I didn't get a call back I figured the trailer had sold. But that afternoon, driving home from the light rail station, I heard a strange electronic beeping. I quickly checked the gauges and systems display in the Jeep but saw nothing amiss. I checked the phone and found a voice-mail message. The trailer owner had been out all day. I called back, the trailer was still available and we arranged for me to see it Friday morning.

I called this morning, got directions and drove up to Coloma. As I pulled into the yard and saw the trailer, I was pretty sure I'd be taking it home with me. Met Bill, his dog, and 2 cats and spent an enjoyable hour talking about trailers, boats, fishing and an assortment of other topics.

The trailer is a used Caulkins with 12" wheels, Bearing Buddies, lights, winch, and jack. Yes, it is used but Bill took good care of this trailer. I bought it.

We switched out the 2" ball I had with a 1-7/8" ball needed for the trailer, hooked it up and I went home. 15 minutes or so down the road, I stopped to check the hubs. They were cool to the touch! The hubs were still cool when I got home 45 minutes down U.S. 50 later.

I will install bunks to fit the Goat and I will build a light bar to mount on the transom so the lights will be more visible to following drivers. Other than that, I won't have to do anything to have the trailer ready to haul Karen Ann to new adventures.


Interesting side note here... I have been in the foothills more in the past month than in the last five years: Milling wood in Placerville (two recent trips); borrowing a trailer in Auburn (three recent trips); and buying the trailer today in Coloma (one trip).

Launched!

Despite the threatening skies and dire forecasts, 11 hearty souls shared last Saturday afternoon's launch of Karen Ann, my Goat Island Skiff.

Things went well - (even with the slight leak!) - and everyone said the boat moved very well through the water. This is encouraging to me as there were many issues with the rowing set-up - not the least of which was my rowing style and technique (needs a lot of work!). Of course, from where I sat, I couldn't see how well the boat moved. I heard there may be video - but I won't have access to that until tomorrow.

Here is Karen Ann being launched:


My first row:


Another view:


And, I think this pic sums up how I felt about the launch:


Karen Ann is launched and I feel a great relief. Now, all I have to do is repair that leak, finish out the interior, build the mast, order the sail, finish the oars, and find a trailer. Nearly done!

Karen Ann is back in the shed, upside down on sawhorses, with a small space heater underneath to help dry things out.

Tuesday, February 2, 2010

Today would have been Karen's 54th birthday...

Karen's son and his wife came up to Sacramento for a visit.

We celebrated the day by christening my new Goat Island Skiff Karen Ann. We admired the fine lines of the GIS, toasted Karen, toasted the Karen Ann, and enjoyed a fine dinner.


It was a good day.

Saturday, January 30, 2010

More Progress

The light of day:

Forward interior:


Starboard side:


Bow:


Port side:


While the boat was sitting outside an elderly couple walked by and the gentleman was very complimentary about the boat. Seemed like he wanted to stay and chat but his wife was on a mission... they kept going... But later in the afternoon I had the double doors open and several people stopped to see what I was doing. A family (Mom, Dad, 7 or 8 year old daughter) stopped to ask what I was doing. The daughter said, "That looks like something my grandpa could do." I said, "So could your Dad." Her response, "No. He couldn't" A little bit awkward as neither the Mom or the Dad laughed about it... Then a guy stopped by and told me he is building a boat too! A 12' dinghy but planked with boards some how because he asked how I got such long plywood. And finally, a couple of 30-something women out for a walk stopped to see what I was doing. They were impressed that I was building a boat. I should open those double doors more often...

Tomorrow I'll apply three coats of epoxy and tape the chines. Monday, I'll apply one or two coats of primer. Tuesday will see one or two more coats of primer. Wednesday we'll turn the boat over again so the seats, breasthook and quarter knees can be installed.

Getting there...

Wednesday, January 27, 2010

Busy

Lots of work going on...

The the inwale spacers and inwales have been installed.


The mast step and mast partner have been installed.


The knees and breasthook have been crafted and are nearly ready to be installed.

The center case is being fit to the hull and BH-3.

My estimate of turning the boat on Sunday is being revised to Saturday. This gives me an extra day to work on the bottom before the planned ceremonial launch on February 6th.

Saturday, January 23, 2010

A Steady Stream...

Progress is picking up the pace...

The gunwales have been installed. The inwales and gunwale caps have been scarphed and glued. The first set of inwale spacers will be installed tomorrow. The breasthook and knees are being worked on and should be ready to be installed late tomorrow.

My plan is to have the interior fitted out and be ready to turn the boat over by Sunday afternoon. Once the bottom is up, I can begin prepping (filling and fairing screw holes, trimming the bottom, and taping the chines) the bottom for primer. And once there is a coat or two (or three) of primer on the hull, it can be launched.

Still a lot to do...

Tuesday, January 19, 2010

Slow But Steady

Tonight I installed the framing and stringer to support the front seat. The installation went pretty smoothly, particularly with the "timber clamps" described in the plans. Describing them is difficult... a picture is worth a thousand words - but the computer is not cooperating.

Tomorrow I need to drive back to Ed's to mill the fourth piece for the inwale - for some reason I only milled 3 pieces to 16mm when I was up there a week ago. I could plane the fourth piece by hand - but I am not confident enough with the plane to size the thickness of a timber. Planing the edge of a plank is no big deal but planing the width of a piece - particularly one so visible as the inwale - is a bit more than I want to try right now.

Thursday I expect to get the center case center seat framing installed.

Monday, January 18, 2010

Rear Seat Framing Installed

The framing and stringers for the rear seat were installed this afternoon.

Did I say stringers (plural)? Yes, I did. I decided to install an access plate in the rear seat to be able to reach/install the rudder gudgeons so the single stringer down the center line wasn't going to work. Two stringers spaced wide enough to accommodate the access plate was a simple solution and didn't involve much work.

Installing the framing along the sides was pretty straight forward. I used the clamp and timber method of holding the framing against the hull while the epoxy sets up. Pretty clever system and it applies a good bit of pressure.

One minor concern is that the framing appears to slope down from BH-4 to the transom. Hopefully, when the seat is installed and the boat is on the water, this will prove to be an illusion. In any event, it is what it is - the framing lines up with the top edge of BH-4 and the top edge edge of the seat support frame glued to the transom - and there isn't a lot to do about it now. It'll be fine.

I took pictures but my computer is acting up and will not let me download pics from the camera to the computer.

Sunday, January 17, 2010

The Bottom Glue-Up

In the excitement of having a completed hull I pretty much over-looked describing how the whole process went.

The plan was to glue the bottom on about two hours before my son was due to arrive. This was based on a misreading of the plans.

I got to the shed around 8:30, thinking I had a lot to get ready in order to glue the bottom on by 11:00. The sawhorses were rearranged to better support the hull. Using masking tape (lining up edges), I put reference marks on the hull and bottom so I could be sure to align the bottom. Rereading the plans I noted that the boat should be turned over right after gluing the bottom on which meant I had time to kill. I went home...

Back at the shed, I gathered a collection of planks and boards to use to support and prop up the bottom as the gluing progressed.

My intent was to follow the plan: glue to BH-1, then BH-2, and to each BH in succession. The reality is BH-1 and BH-2 are too close together to do two separate steps in the gluing.

I propped up the forward section of the bottom with a 1x4x6' board, mixed a batch of epoxy and went to work. I "painted" straight epoxy on the chines, stem, BH-1 and BH-2. I then added fillers to thicken the epoxy. I used my veggie-bag method of applying the thickened epoxy and was able to apply a nice uniform thread of thickened epoxy along the chines aft past BH-2. I applied "extra" epoxy on the stem. Removing the prop, I screwed the bottom to the stem and then screwed it to BH-1. I added screws along BH-1 and then screwed the bottom along the chines.

Using 2z4s to prop the bottom off the chines, mixed another batch of straight epoxy, and applied it to BH-3 and the chines back to BH-4. Thickened epoxy followed along with screws to the BH and chines.

Repeated the process back to the transom.

When screwing the bottom to the BHs I missed one screw in each of BH-2, 3 and 4. Those errors were easily fixed.

About 10 minutes after I finished the gluing process, Scoot arrived to help turn the boat over. We walked the boat out of the shed, rolled it over, and set it down.


We rearranged the sawhorses and swept up a bit, took some pics and moved the boat back into the shed.

I mixed up a couple of batches of thickened epoxy to apply fillets between the bottom and the chine logs. I did a section and handed the veggie-bag of epoxy to Scott - and he fitteted a section. Two batches later we were done. Seeing how easily Scott was able to use the veggie-bag added to my impression that the thinner bag from the produce section of the grocery store is a better applicator than the thicker Zip-Loc bags.

I'll outfit the interior and then turn the boat over. The screws need to come out, the holes filled, the hull faired and primed. Hopefully, I can get all that done by February 6.

Time will tell.

Saturday, January 16, 2010

It's a BOAT!

I am really pleased to say, I have a BOAT!!!

Gluing the bottom went pretty well this morning. No mishaps or catastrophes - although I did put one screw through the hull side and I missed bulkheads with two screws. All in all, not bad.

About 10 minutes after I finished the third and final section of the bottom, my son arrived. We opened the garage doors and walked the boat out, rolled her over and walked her back inside. We did take a few minutes for the photo op...

Here she is... Karen Ann


Obviously, there is a lot to do. But, boy, oh boy, today marks another milestone and I feel GREAT!

I have a BOAT!

Followers

About Me

My photo
I'm a woodworker, boat-builder, sailor, cook, baker and all-around good guy!